The OuUnPod
A blog intended to provide know-how and know-why on building your own EEG set for purposes of neurofeedback, scientific vwork, art and self-reflection.
dinsdag 22 maart 2011
maandag 13 december 2010
Funds raised for DIY EEG project.
Robert found some likeminded brains:
"We put together an EEG kit for a workshop we held on the 25th "teaching people to integrate EEGs into Art". We were pretty amazed at peoples response in actually being able to see their brainwaves. We'd like to share that amazement with as many people as we can. While I think I'm a pretty swell teacher, I realize that physically we can't hold a workshop for everyone. And so the next best thing would be to offer the EEG as an affordable Kit.
We should perhaps consider following their approach to funding.
"We put together an EEG kit for a workshop we held on the 25th "teaching people to integrate EEGs into Art". We were pretty amazed at peoples response in actually being able to see their brainwaves. We'd like to share that amazement with as many people as we can. While I think I'm a pretty swell teacher, I realize that physically we can't hold a workshop for everyone. And so the next best thing would be to offer the EEG as an affordable Kit.
TL;DR: We'd like to use this kickstarter to spread our love for EEGs and more generally Neuroscience, in the form of an easily put together kit."
woensdag 8 december 2010
Fixing bluetooth connection
As it turned out the BlueSmirf Bluetooth module by default listened at 57600 baud, while the microcontroller was sending out bits at 115200 baud. Sending commands using Putty to change the baudrate solved the problem (but not after also discovering a defective flatcable connecting the two board. Always make your own!)
http://www.sparkfun.com/datasheets/Wireless/Bluetooth/rn-bluetooth-um.pdf
http://www.sparkfun.com/datasheets/Wireless/Bluetooth/rn-bluetooth-um.pdf
maandag 6 december 2010
zondag 5 december 2010
woensdag 1 december 2010
Making the Pod
Making holes in casing with perforator
for battery holders
Drilling holes for bolts
Attaching batteryholders
with plastic screws and bolts
with plastic screws and bolts
Amazing job aligning and drilling the holes
with "the puncher"
Note the spacing: two bipolar leads and one DRL
(Right Leg Driver)
Back of front panel
Always use shrinkwraps to prevent
short circuit when box is closed.
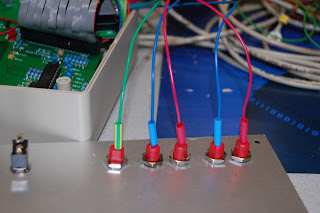
5x Touchproof jacks 1.5 mm contact
7.9 mm thread diameter, from MedCat
On / Off switch wired to battery
Rewiring board LED
With a little red lens
Beautiful!
Replacement LED stuck into lens
Front panel, casing, battery & board
Wired touchproof sockets to EEG/DRL
Back of front panel
Double sided tape to attach LED
Sandwich boards with stack screws
USB breakout board attached on
floor with plastic screws and bolts
Drilled and filed hole socket for connection
Attached boards to floor of casing
with screws and bolts
Strapped with tiewrap to battery holder
(60 Euro)
Closing the casing after cleaning up
wires with tiewraps
Removing the plastic protection of
aluminium front and turning it on!
Abonneren op:
Reacties (Atom)


